The creation of this blog with Hugo, GitHub Pages, Forestry, and Google Domains
A coworker asked how I setup this blog so for their and others edification I’ll put the steps into writing.
I decided I wanted a super simple blog that would render out to static pages so I could leverage GitHub pages for my hosting, leaving my only expense the domain name. So far I have settled on the stack of Google Domains for my domain, GitHub Pages for my hosting, Hugo for my website framework, and am currently toying with Forestry for content management and creation.
Installing the prerequisites (on Windows)
Git/GitHub
I like my command line and tend to use cmder for console emulation. The main package has an option that includes a git install allowing quick setup of a git enabled console environment with a very slick console emulator in one quick step.
An alternative is to use the GitHub Desktop client or classic Git.
Hugo
I initially toyed with Jekyll for my blog but after looking around at Ariel Sanchez Mora’s blog I decided to switch to Hugo. I like the selection of free ready to go blog themes and always like toying with Go.
I tend to have Chocolatey installed on most Windows admin and development boxes I use which makes the Hugo install a one-liner.
choco install hugo -confirm
After it is installed you can follow the quickstart guide, but I’ll list the steps.
Make a local site in your current folder like so, my domain is tonyh.dev so I named mine tonyh-dev
hugo new site tonyh-dev
Once the initial structure is created you’ll want to pick a theme. There are a ton of amazing themes available at the Hugo Theme Page. Pick the one you want and import it into your starter like like the following. I used the m10c theme.
cd tonyh-dev
git init
git submodule add https://github.com/vaga/hugo-theme-m10c themes/m10c
Then add it into your config file
echo theme = "m10c" >> config.toml
Next up, make your first post
hugo new posts/my-first-post.md
And then fire up the local testing environment
hugo server -D
Navigate to your site at http://localhost:1313/
Hugo uses some automagical auto-updating when testing locally, so any changes you make to the site will be reflected in the browser as you edit the next config files.
Fire up your favorite text editor, I have been a big fan of VS Code ever since I took it for a spin, and edit your config.toml. Here’s mine as it stands today. Your theme may have different params than mine.
baseURL = "https://tonyh.dev/"
languageCode = "en-us"
title = "@TonyHarmelink blogging!"
theme = "m10c"


[params]
author = "Tony Harmelink"
description = "I'm Tony Harmelink. I work primarily on SysAdmin, DevOps, and EUC projects"
  [[params.social]]
    name = "github"
    url = "https://github.com/tonyharmelink"
  [[params.social]]
    name = "twitter"
    url = "https://twitter.com/tonyharmelink"
Push to GitHub
Continuing on in the command line while in the root folder of your site, we need to add the rest of the files that we and Hugo have created to the git manifest, set our first commit message, setup what remote repository we are pushing to, and push to GitHub.
git add *
git commit -m "first commit"
git remote add origin https://github.com/tonyharmelink/tonyh-dev.git
git push -u origin master
From here, you can set the staging repository to private now that GitHub has changed their rules and free accounts can make repositories private.
While you are on GitHub, you will also want to create your publishing repository for GitHub Pages. This repository needs to be named the same as your username. For instance mine is https://github.com/tonyharmelink/tonyharmelink, you can see the static generated content that composes this site there.
Forestry
I have (so far) decided to use Forestry to author drafts on my staging repository and publish to the main static repo. It has a nice front end, allows me to edit from wherever I am, and from whatever device I am on.
To set it up, add a site, select Hugo of the latest version, connect to GitHub, choose your repository and branch. The defaults from their walkthrough have worked for me. Set your publishing target to the repository on GitHub that is named after your username for GitHub Pages.
After saving a post in a non-draft state Forestry will generate your static site and assuming your repository is named as it should be your site will be up at http(s)://<username>.github.io/
Google Domains
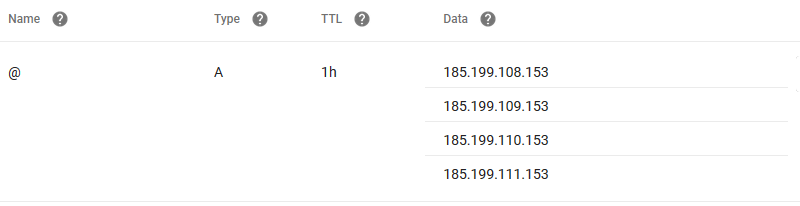
Next up, the only cost in this project, a domain name. I decided to go with Google Domains because I wanted one of the new .dev domains. This should work with whatever registrar you have. Buy your domain and setup your DNS to point to GitHub like below.
One of the final steps is to put a file named CNAME in the static folder of your generator repository containing the apex site for your domain, such as for me it contains tonyh.dev
From there you should be good to go. Wait for DNS to propagate, for your HTTPS certificate to generate, and start blogging.